[3.14] [Raider] Mahuxotl's Machination Hybrid Trapper
 ______________________________________________________________________________ Introduction:
스포일러
For 3.14 Ultimatum league I decided to make something different to fit the new challenging content of steaming hords of monsters the trial master throws at us.
This build utilizes the newely introduced Mahuxotl's Machination shield and builds around it for great offense, defense and sustain. I also wanted to make good use out of the alternative ailments Scorch, Brittle and Sap since all of them benefit this type of build a lot by including the underutilized Leaderships Price amulet from Heist league which is in my opinion a sleeper unique only very few people know how to utilize it to great effect. I reached almost lvl 97 as I am writing this guide and can comfortably do endgame content and bossing - so I wanted to share it with you The best thing: You can choose what type of traps you want to play, since the passive tree and gear is very general and flexible regarding that. I personally play with Arc Trap and Explosive Trap, but maybe you want to go with something like Fire Ball Trap and Ball Lightning Trap instead. You can even switch skills out if you get bored at some point and try something new without changing anything but gems and maybe some socket colors. ______________________________________________________________________________ Pros and Cons:
스포일러
Pros
+ great clear speed + excellent bosser + can do any map mod + very tanky due to multiple layered defenses and max res scaling with a high effective HP pool + unconditional fast movement speed and great mobility (Raider) + great endgame scaling possibilities chasing and crafting your own gear for setting long term goals Cons - not beginner friendly due to involving several complicated mechanics and interactions - somewhat difficult to balance stats to enable Confluxes - difficult to level as this build from scratch (recommend leveling as Caustic Arrow and switching around lvl 55) - top end gear can be very expensive or you have to craft it yourself which requires crafting knowledge and a high budget ______________________________________________________________________________ Video Showcase:
스포일러
- 3.14 Shaper Kill: https://youtu.be/mQw3KhfjY0c
(Note: To demonstrate tankiness against DoTs I purposfully stepped into degens multiple times in phase 2 and phase 3 and tanked shaper balls at some point - phase 1 shows a clean methodical approach with the build) - 3.14 T16 Ultimatum (80%+ quantity): https://www.youtube.com/watch?v=-VgNHzqU3Iw (Note: As you can sadly tell performance is sometimes just really harsh this patch, especially in Ultimatums. I recorded this low performance footage on purpose to show how the build performes, when you encounter heavy lag - it is no problem at all, you still do fine. I porpusfully dive into a huge pack of rares in the end just to demonstrate how the character can take big hits without any issue) ______________________________________________________________________________ Defensive Layers:
스포일러
- Divine Flesh / Tempered by War Combo - Max Resist Scaling (Leadership's Price + Tree) - Everlasting Sacrifice (ES recovery is triggered by Tinkerskin while triggering traps by enemies = 100% uptime in Delve, Ultimatums, Bosses and high densitiy maps while clearing fast) - Eternal Youth (ES recharge recovery is applied to life instead - solves all sustain problems for throwing traps since recharge is not interupted by spending life for skills! Tinkerskin provides sustain when recharge is interupted by a hit) - 95% chance to evade (with and without wind dancer) - 70% Dodge (goes to max when hit recently) - 70% Spell Dodge (goes to max when hit recently) - 40% true physical damage reduction (Aspect of the Crab + Endurance Charges + Pantheon (use Lunaris for Mapping and Solaris for endgame bossing, Aspect of the Crab works really well for high evasion/dodge builds since when you get hit the second time it is fully up again) - 18 second long lasting Fortify on demand thanks to Vigilant Strike setup - Perma Phasing (Raider) - Ailment Immunity (Raider) - great stun avoidence (thanks to tree and always having at least some ES) - can even get stun immune with stacking the right jewel enchants if you want to Frenzy and Power charges are up all the time (30% chance to gain either on trap triggering) and Endurance Charges are up against bosses/high density all the time (15% chance to gain on trap trigger) where they are crucial (check effective HP in PoB tab to see how tanky this build is against oneshots) Can do all map mods (No regen is no issue for this build compared to traditional saboteur traps thanks to Eternal Youth + Slavedrivers Hand Combo), Reflect is no issue because Traps, less recovery is no issue thanks to Tinkerskin and very high throwing speed, added % phys as elemental damage does not one tap you thanks to great mitigation and Everlasting Sacrifice Degens are no problem at all; Abberath Pantheon helps out a great deal against ground effects - if you keep throwing traps at enemies you can even stand still in most degens thanks to Tinker Skin recovery alone. ______________________________________________________________________________ Mechanics Explained: Mahuxotl's Machination and Evelasting Sacrifce:
스포일러
This shield provides us with 5 Vaal themed keystones all at once: - Corrupted Soul: gives 15% life as extra Energy shield - Divine Flesh: +5% max Chaos resistances, 50% of elemental damage taken as Chaos, all damage bypasses Energy Shield - Eternal Youth: ES Recharge applies to life instead (this is what enables our sustain, since paying for skill cost does not interupt recharge) - Immortal Ambition: leech does not stop at full life, Energy Shield degenerats at 5%/sec, you start with no ES. - Vaal Pact: max life leech rate is doubled, can not regenerate life - Everlasting Sacrifice: when ES reaches maximum it gets fully depleted and we are granted a buff that provides +5% max to all resistances for 4 seconds We enable Everlasting Sacrifice on this build with the Tinkerskin unique body armour which lets us gain 50 ES fo every trap triggered by an enemy. Since we use cluster trap support and have incredible trap throwing speed we are able to keep this buff up constantly when it matters most (in boss fights, in Ultimatium, in Delve or in high density maps with a lot of monsters) - in boss fights you spam traps at a single target which triggers around 9 traps/sec which translates to 450 ES/second gained. We have an ES pool around 1k in endgame so we are able to trigger Everlasting Sacrifice every 2.2 seconds which is plenty enough to sustain the buff constantly in given situations. Eternal Youth and Life Sustain without being able to leech or regen life:
스포일러
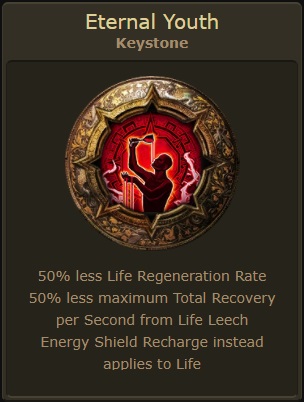 Eternal Youth is a great keystone if you can't depend on Life regen or leech for evasion/dodge based life build that does not get hit frequently. The Ranger startign position and the right side of the tree does not provid much life regen anyway and since this is a trapper, we can't leech either. What makes this keystone great is, that we can utilize Slavedrivers hand or Lifetap with trap with it (since Recharge is not interupted by satisfying skill cost - so if we spent life to use our skills, recharge won't stop - recharge provides 20% max life/second which is plenty to spam 100+ life cost trap skills. Recharge will stop briefly if you get hit; but for this case we got Tinkerskins 100 life recoverd when a trap is triggered by an enemy - with cluster traps we regenerate 300 life/skill use if traps are triggered by enemies which covers the time we got hit recently and also provides great sustain overall for the build Vaal Pact, in our case, is neither a downside nor an upside for this build, since we can't leech anyway and we did not invest into life regen at all. The Divine Flesh - Tempered by War Combo:
스포일러
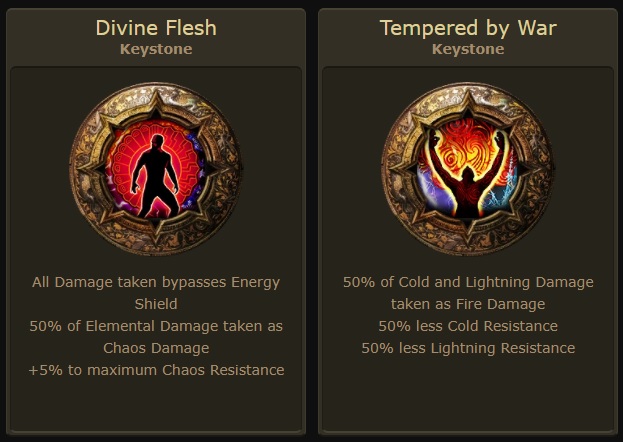 Divine Flesh is a very popular keystone often used in several builds which grants 50% elemental damage taken as Chaos damage. When paired with Tempered by War (50% of Cold and Lightning damage taken as Fire) from a Lethal Pride Timeless Jewel (Rakiata Variation), 50% of Lightning and Cold damage is taken as either Fire or Chaos damage, which means that 100% of that damage types are converted to other damage types, which also applies to DoT damage. The Result:We only take either Fire or Chaos damage and can nver take Cold or Lighting damage with that combo, which means we can neglect scaling Cold and Lightning resistances at all! It does not matter if we are deep red negative in that department. Because of that we can focus on scaling only Fire and Chaos resist for our defenses and overcap them for masssive elemetnal mitigation Keep in mind: Damage taken can only be converted once! For example: If you have a gear piece with "x% physical damage is taken as cold damage" the physical incoming hit will get converted to cold but not get further converted to fire or chaos => you will take cold damage in that case which you should avoid since that would gimp your defenses! Leadership's Price and Scorch/Brittle/Sap Conflux
스포일러
Leadership's Price not only provides +x% to maximum resistances (since this build only needs fire resistances and can ignore cold and lightning resistances you just need to look out for a well rolled fire one, the other two don't matter) it also gives your character Ailment Conflux for Scroch Brittle and Sap at the cost of not being able to ignite, chill, freeze or shock. Conflux means that you ALWAYS inflict the given ailment with any hit damage regardless of damage type (if you deal multiple damage typs at once all get summed up and count as 1 hit). - Brittle provides up to +15% to BASE critical strike chance - Scorch provides up to 30% elemental penetration - Sap provides up to 20% less damage dealt from the monster which it is applied too We have no official information on how to calculate ailment treshold for those alternative ailments, but don't worry, I got you coverd and tested it ingame: From my testing you would roughly need 200k damage in a single hit to fully scorch Shaper, a 80.000.000 HP boss; 150k single hit damage to fully brittle and around 1.000.000 single hit damage to fully sap. (Tests are still estimations and no exact numbers, but that was the most I could figure out myself so far) What does that mean? With nearly any high hit damage build you can reach 100% critical strike chance permanently after the first big hit. With enough investment you can also fully scorch anything in the game for 30% penetration of all elements. Sap is the exception of the rule, while it is possible to sap anything in the game it is very hard to fully sap a boss like shaper... unless you have a very high hitting skill and/or scale lightning ailment effect on top of that. Investing in any form of ailment effect can be very benefitial for builds that go for these ailments. How does this build make full use of Ailment effects?
스포일러
 Since this is a high hit damage build it is easy to break ailment treshold of all monsters in the game almost naturarly with enough build and gear progression. But there is some extra things to point out: - For Brittle we scale up to 20% cold ailment effect from a shaper helmet provided by the mod "socketed gems are supported by Hypothermia - For Sap we use Arc and Vaal Arc which have build in Lightning Ailment effect on the skill gem (with Vaal Arc you are able to fully sap even Shaper thanks to high hit damage and insane lightning ailment effect scaling on the gem; vaal skills recharge more quickly against bosses now too so that you can have great uptime) The biggest thing is probably the "chance to deal double damage" mod which you can get on a weapon. One ocasinal double damage hit will break a higher ailment treshold and lasts for a couple of seconds which is enough to ramp up quickly until maximum ailment effect cap. The next big important thing is skill mechanics: Arc is a chaining ability which usually hits a individual monster at least twice if you through your traps into a pack of monsters - the first hit applies the ailments and the second hit form the chaining then hits like a truck and kills it. Explosive Trap is very unique and just an excellent ability for this strategy: one trap triggers 8 small explosions (10 with helm enchant if you want) and each explosion will apply ailements to the enemy! Example:
스포일러
Characer throws 1 Explosive Trap: - First explosion: does not roll crit, deals 10.000 damage (enemy is scorched for 10% penetration and 5% base crit and 5% less damage taken) - Second explosion: does not roll crit, now deals 11.000 damage (because enemy is now scorched for 10% pen) => enemy gets further brittled for now +6% base crit and still 5% less damage taken from sap. - Third explosion: rolls a crit; deals 42.000 damage, applies 25% pen through scorch and caps out at +15% base crit and saps for -12% damage dealt - Fourth explosion: now has 100% crit chance (as well as all other explosion comming from now on thanks to maximum brittle), hits for 60.000 damage, applies 30% pen through scorch and maxes out ailment effect, it also applys a 17% less damage dealt sap - Fifth explosion double damage is triggered (from affix on gear) you deal a >100.000k hit this time which fully scorches, brittles and saps the enemy ... and so on, damage ramps up with each consecutive explosion until max damage is reached As you see: each consecutive multi hitting ability will "ramp up" ailment effect of scorch, brittle and sap over time with each hit. With fast mulihitting abilites like Explosive trap you can reach full ailment effect on bosses in under a second. (this build has 72 explosions/second for comparision) Due to the amulet our character is not able to Freeze, Chill, Shock or ignite... but our Summon Skitterbots are still able to Chill and Shock nearby enemies! (since they are considered minions which are not our character) ______________________________________________________________________________ Leveling Level 1-68
스포일러
I would recommend leveling as Caustic Arrow through the story and switching to traps when you can afford to equip a Tinkerskin at lvl 68 - I highly recommend this guide if you need some advice for the leveling phase:https://www.pathofexile.com/forum/view-thread/2077932
Bandits
스포일러
Kill all => +2 passive skill points
Ascendancy Order
스포일러
Rapid Asault - Quartz Infusion - Avatar of the Veil - Avatar of the Chase
Pantheon
스포일러
- Soul of Lunaris (Mapping/Inviations/Delving) / Soul of Solaris (Bossing) - Soul of Abberath ______________________________________________________________________________ What gear do I need to start out and how expenisve is it to get into:
스포일러
- Any Mahuxotl's Machination Shield (1c) - Any 5l Tinkerskin (35c) - Any Aziri's Step (15c) - Any Leadership's Price with a postive fire resist roll (5c) - 2x Rings with good resists and crafted life (25c each) - Any belt with good life and resists (35c) - Any Shaper helmet with Hypothermia and Trap and Mine damage (15c) - Any semi decent spell damage weapon you can afford and craft double damage on (30c) - Any Leathal Pride (Rakiata) variation (40c) - Some decenlty rolled flask, you can do this yourself (10c) - any rare gloves with life and resists (25c) You do not need Slavedrivers Hand to start out, just use life tap support on your traps until you can afford one; these gloves should be your first ugrade. All in all exspect to invest roughly 250c to start out; you will be good until early/mid red maps with this setup. Use normal gems and supports to start out with and upgrade slowly when you can afford it - awakened gems are not needed but will scale your damage noticably in lategame. Every tiny gear upgrade matters and you will feel it, which is great about this build. Keep in mind: Prices are as of 3.14 Ultimatum league after 1 or 2 weeks after league start. Prices can change over time, don't take them for granted ______________________________________________________________________________ Path of Building links All links provided here require the Path of Building Community fork https://pathofbuilding.community/ Leveling PoB Level 68-96 Level 96 (my character PoB) ______________________________________________________________________________ Passive Tree and Cluster Jewels Passive Tree:
스포일러
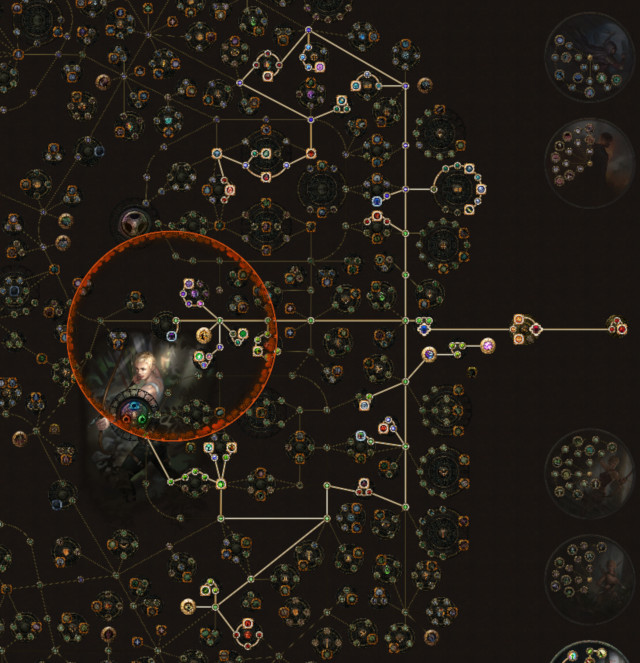 The tree is fairly compact and stretches across the left side - since we get Eternal Youth from the shield, wo do not need to travel anywhere near the middle which is a huge benefit. Tip: Don't hesitate to grab extra passives for Strength/Dexterity/Intelligence if you need to balance out your Attributes to enable Confluxes at any point in your gear progression. Cluster Jewels:
스포일러
We use one Medium Trap and Mine Damage Cluster Jewel: - Arcane Pyrotechnics - Guerilla Tactics / Set and Forget / Surprise Sabotage Arcane Pyrotechnics is a must have imo since it basically grants permanent Arcane Surge uptime. The second notable is your choice, all provide similar amounts of benefits. Try to get Attributes and resists on here if you can on top of that. Then we use one Small Life Cluster Jewel: - Fettle (or anything decent you can get) While Fettle is for sure the best one here the other ones are not far behind. Try to get Attributes and resists on here if you can on top of that Lethal Pride Timeless Jewel:
스포일러
You will need a Lethal Pride (Rakiata) varient for this build to function - socket it above the Ranger start area to convert the Perfect Agony in the Tempered by War keystone. The jewel itself provides a lot of much needed strength on the build - look out for the following rolls on notables: - strength - fire resist - double damage - reduced extra crit damage taken - physical damage taken as fire - gain x% physical damage as fire damage - fortify effect Don't copy my jewel seed blindly please and don't get scammed! Strength and fire resist are very common to roll on these with divine orbs - you do not need to buy an expensive one Watchers Eye:
스포일러
You don't need one but they are nice if you can fit one in. Pick one that benefits the skills you have chosen for your traps. I use a Wrath one for extra crit and added damage. Other Jewels:
스포일러
Nothing special here - go for life, resist, crit, damage. If you are using Abyssal Jewels on your build go for flat damage, crit and life. Abyssal Jewels can also roll a special mod named "x% reduced physical damage taken if not hit recently" which works great on any Evasion/Dodge based build like this is. ______________________________________________________________________________ Gearing and Gems: WEAPON
스포일러
 For the weapon you ideally want a scepter or rune dagger base since you want to be able to Vigilant Strike with it to gain fortify when needed. Otherwise, look out for: - + level to all skill gems/elemental skill gems of your choice - Spell Damage - Double Damage / Double Damage while focused - Critical Strike Multiplier Gems: The Aura Setup goes here. If you want to fit in an Aspect you need an Enlighten level 4, otherwise it won't be enough. The Weapon I use favors Lighting skills. You can do a weapon swap setup with another weapon more suited for Explosive Trap if you really want to for endgame bossing, but I in my case I think my damage is more than fine with the one I use (or I could just use Ball Lightning trap instead of Explosive Trap if I wanted to for example)  SHIELD
스포일러
 Mahuxotl's Machination is used here to gain access to 5 keystones (see Mechanincs Explanation section for more info). It is a great corruption target to get some extra %life or % of physical damage taken as fire or chaos. Gems: The Dread Banner Generostiy combo really benefits this build a lot since it decreases nearby enemies accuracy. With natural high evasion is just great. I use Steelskin as a guard skill here for extra defenses on left click.  HELMET
스포일러
 Look out for a Shaper evasion base helmet with "Socketed Gems are supported with Hypothermia" and "Socketed Gems are supported with Trap and Mine Damage" to gain a second 6 link. Helemt enchant depends on the trap skills you choose to use; Skitterbots AoE enchant is just flexible and benefits everything, go with what you like most. Gems: Your secondary trap goes here to create an effective second 6 link. On Explosive Trap I recommend using Divergent Cluster Trap Support to lower the trap spread for better overlapping explosions.  BODY ARMOUR
스포일러
 Tinkerskin is the way to go here since it enables Energy Shield recovery on a tap build which fuels Everlasting Sacrifice (for more info look at Mechanics Section). Gems: Our main trap setup goes here. Use Anomalous Cluster Trap for higher trap throwing speed to make the build even smoother. I use an Anomalous Vaal Arc Trap for longer chaining range (you do not need this it is just great to have)  GLOVES
스포일러
 Slavedrivers Hand is a key item for a Raider Trapper since it lets us make use of all the cast speed provided from permanent Onslaught and convert it to trap throwing speed! 3 traps/sec is easily reachable endgame without much investment. If you do not want to use these you have to link Life Tap to your trap skills. Rare gloves are not bad either if you need the life and resists. For the enchant I recommend going with Commandment of Reflection which spawns a clone if you get damaged by a hit which usually provides enough distraction and time to get our defense layers back up and gain some distance. Gems: Here goes to Vigilant Strike - Fortify Setup for 18sec Fortify uptime on demand; I highly recommend it for Ultimatums. The extra free slot can be used for Assassins Mark for bosses for more crit multi (only level it up as much as your mana allowes you too). Use that over a curse since you already have a lot of penetration anyway.  BOOTS
스포일러
 Atziri's Step provide everything what this build wants; life, high evasion and spell dodge. You can also wear some nice influenced boots if you want, but those will be much more expensive to get. For the enchant we go with "x% to critical strike chance if you have not crit recently" (since this is a trapper our traps crit, but not our character so this is always up) Gems: Here goes your movement skill and Bear Trap for further debuffing single target. You can use Flamedash if you want to too; it feels great thanks to having a lot of cast speed on Raider anyway and use CWDT-Imortal Call here (I personally don't like it since I rather have Endurance charges up thats why I don't use it)  AMULET
스포일러
 Leadership's Price is a core item of this build. With balanced stats it provides permanent Scorching, Brittle and Sapping Conflux (for more info check Mechanics section) For the anoint we go with %Life - I chose "Constitution" which is expensive but there are other good options too  BELT
스포일러
 For the Belt you can go with any Life/Resist belt or a Stygian Vise if you need to. If you are good in that department you can go with Darkness Enthroned to stack more damage and crit multi. For the enchant we go with "+x flat Evasion while phasing", since we are a Raider and always phase, this is always active  RINGS
스포일러
 The ring slots are mostly the place where the crucial stats come from to balance out your attributes for Leadership's Price to enable conflux. Otherwise you want to gain the major portion of your resists here - after that is covered you can get flat damage on them For catalyst I recommend prismatic to gain even more resists out of this gear slot, if you are already covered go for Fertile for more life. Tip: If you need to balance your attributes carfully only by a single digit number you can use intrinsic catalysts here to fix them up.  FLASKS
스포일러
 You want a Quarz Flask for extra dodge and spell dodge and a Jade Flask for extra Evasion as well as any instant life flask - those are the must haves. The other 2 slots are flexible. I personally like to go with Atziri's Promise for more burst single target damage since it synergizes very well with Exposive Trap and another instant life flask. The second life flask can easily switched out for another damage flask like Bottled Faith if you want but I don't feel I need it. You do not need a Diamond Flask thanks to brittle conflux you are always at 100% crit chance after the first hit (see mechanics section for further explanation)  ______________________________________________________________________________ Wiesl_1404#1448 님이 2021. 5. 15. 오전 11:36:01에 마지막으로 편집 마지막 추천 2022. 1. 27. 오후 6:14:35
|
|
 ______________________________________________________________________________ Introduction: Harvest was nerfed heavily in 3.14 but if you want to know my personal opinion it was not done right. The result of the nerfs as I can tell: Very knowledgeable players and/or very rich players can still craft mirror tier items or near mirror tier items and the average player was excluded again which is a bad direction in my opinion. I consider myself a very knowledgeable player who is able to craft almost perfect items but instead of keeping the knowledge to myself I wanted to share it with you here so that you can do it too (don't worry: you won't have to go to the TFT discord and buy crafts, you can do it all by yourself, and you do not have to spend multiple hundred exalts either to get exceptional results out of it. If you have any questions or need any advice feel free to ask. ______________________________________________________________________________ Helmet Craft: In this section I want to demonstrate how to craft a great helmet for this build. You can for sure also just buy a cheap semi decent one from trade with just the 2 required suffixes and slap life on it with the bench to start out for 20-40C, but if you want to upgrade and craft one yourself read on:
스포일러
Step 1) Get an item level 84 Evasion Shaper base helmet (why ilvl 84: we want potential access to tier 1 resist and tier 1 added lightning damage on there, but we want to block the ilvl 85 shaper mod to thin the affix pool further) Step 2) Perfect fossil it until 30% quality, also use a gilded fossil for swag if you like and scouring orb it afterwards Step 3) Transmute/Alteration craft until you hit "Socketed Gems are supported by lvl 20 Trap and Mine damage" isolated (if you hit a prefix try to annul it or go again) - it will take about 300 Alterations on average to hit it Step 4) Craft Suffixes cannot be changed on it with the crafting bench Step 5) Imprint the magic helm with a Craicic Chimeral
스포일러
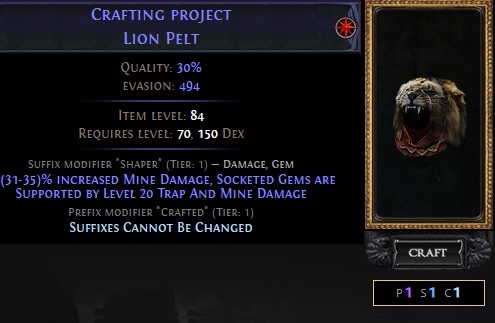 Step 6) Do some Harvest in a zone with at least lvl 74 (you can craft 10 levels above the seed level) until you find "Reforge a Normal or Magic item as a Rare item with random modifiers, including a Cold modifier" and slam your helm with it Step 7) Your chance to hit "Socketed Gems are supported with lvl X Hypothermia" is very high this way (you will hit more than 1/3 of the time on average); if you do not hit it, use your imprint, beast craft again and go again until you are satisfied - you want to level 20 Hypothermia here paired with a T3, T2 or T1 cold resistances and at least 1 open prefix (don't worry it is not that hard to get, and it only costs an imprint beast for each try since you imprinted the bench craft) - if you hit Hypothermia as a solo mod, you can try to roll again (after crafting "suffixes cannot be changed" again) with "Reforge a Rare item with new random modifiers, including a Cold modifier or Cold modifiers are more common" to hit cold Resist on top of that.
스포일러
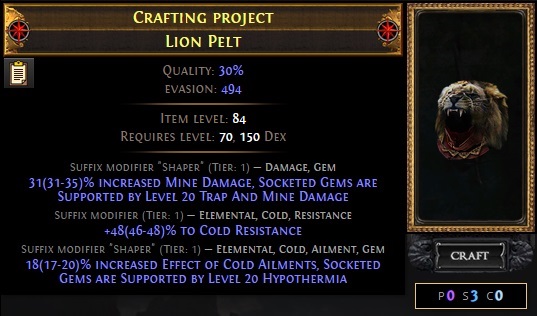 Step 8) Do some Harvest again and look for "change a modifier that grants cold resistance into a similar modifier that grants fire resistance (we do not need cold resist on this build, but we would like to have fire resist very much on there) Step 9) 9) Craft Suffixes cannot be changed again
스포일러
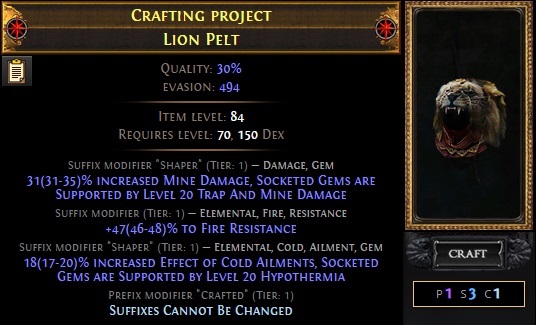 Step 10) You now have two options depending on what you want to do: 10.1) Go for a T1 or T2 "flat life" roll (which is a 1:6.5 chance to hit) with "Reforge a rare item including a new random life modifier" 10.2) Go for a T1 "adds flat lightning damage to spells" roll (which is a 1:3 chance to hit) with "Reforge a rare item including a new random lightning modifier" The second option is, for sure, much easier to hit. If you can live with a bench crafted life mod (70 life) go for it (I will continue with this option here) - If you are not satisfied with your roll just go again back to step 8) (if you are very unlucky and hit 3 prefixes, you have to search for a "reroll prefixes keep suffixes" harvest craft before you can go on to make room for a prefix again. Make sure you have 2 open prefixes left after you hit your desired mod, unless you are lucky rolled high life on top of it of course, then just keep that
스포일러
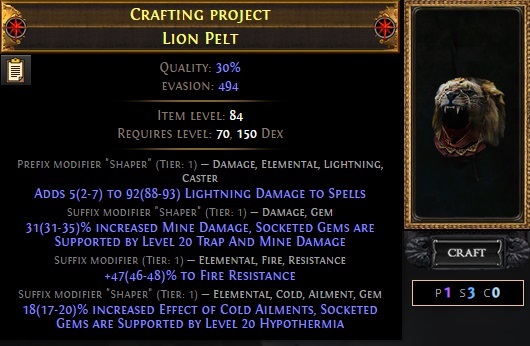 Step 11) Your helmet is almost done now. The next step you have to do is farm Jun missions => get Aisling Lafferty to level 3 and place her in Research; farm up the Mastermind and kill Catarina while Aisling lvl is in Research to get a T1 veiled mod craft. Step 12) Slam your helm with the veiled bench - if you get lucky, you get 2 prefixes to unveil, but most of the time you will get one - these are the ones you are looking for in priority order: - +2 to socketed AoE/Projectiles gems and +10% area of effect (depending on the skill you are using) - 10% of Physical Damage from Hits taken as Fire damage - Hybrid Life/Evasion - additional Physical damage Reduction while foccussed The chance to hit anyone of those is 82% in total since you are given 3 choices (if you are unlucky, craft life and just sell the helm for an adequate price and go again. Step 13) 13) Craft 70 flat Life on the crafting bench to fill your last open prefix and you are done The end result should look something like this - congratulations exile! 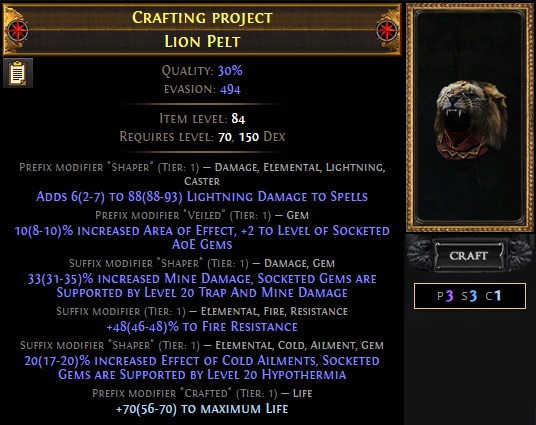 But what about Maven Orb Elevated Mods? Are they possible to get deterministically?
스포일러
Sure you can do that if you want to min/max and invest heavily into it, but it is more of a currency sink in that case. If you want to do it here is what you would have to do: Go back to step 3) Transmute/Alteration craft the base until you hit lvl 20 Trap and Mine damage together with an influence prefix (very hard to do, it must be a blue item, not a rare; it will take around 2000 alterations to hit it) 4) Imprint the item 5) Maven Orb (50:50 chance to upgrade Trap and Mine damage, otherwise go again and use imprint) 6) Imprint again with a new imprint 7) Do the same thing as described above until you hit lvl 20 Hypothermia with high cold resistances 8) Do the same as above and generate any influenced prefix with suffixes cannot be changed + reroll cold/lightning 9) Hit the Maven Orb again (1:4 chance to upgrade Hypothermia and remove the influenced prefix => otherwise use imprint and start with step 7) again 10) If you are lucky and hit it suffixes are done, and you can do the same path as described above to finish prefixes ______________________________________________________________________________ Weapon Craft: Crafting caster weapons, especially +1/+1 ones, is costly and difficult to do since to recent nerf the Harvest crafting. If you want a similar weappon to mine I would recommend just buying a +1/+1 base (you can get "cheap" ones since they drop somewhat frequently from Grand Heists) and go from there. If you really want to invest, you have to do the rather long and complicated RNG route of fracturing +1 to all spell gems, which is expensive and you can't do that without TFT, since you won't find enough fractures yourself to perform it. But, again, don't worry, I got you covered here with a different, much cheaper craft of a +1 elemental spell gems weapon with high spell damage (you will only lose around 8% damage compared to the one I use; compensate by using a +1 chain helm enchant instead if you desire). I would only think about another upgrade to a similar to my weapon if you want to reach lvl 26 vaal arc for the additional chain, which is only possivle with a GG corrupted chest. Otherwise, I would probably still be playing with the next craft I show you here: +1 Elemental Gems / High Spell Damage Sceptre
스포일러
Step 1) Farm up a few sets of the "Death" divination card (just do Bog and Marshes maps, they are a common drop or buy them for a couple of chaos if you like) Step 2) Create a new character and kill Hillok with it to reach lvl 2. Go to your hidout and turn in your "Death" sets at Navali to create ilvl 2 Montragul's Grasp Void Scepters Step 3) Corrupt them and hope to brick them, turning them into a corrupted rare Void Sceptre. Do that until you have 5 corrupted rare Void Scepters Step 4) Go to the vendor and sell all 5 corrupted scepteres at once to get a uncorrupted one back. Identify and scour it, making it a white item. Congratulations; you now have aquired a ilvl 2 Void Sceptre crafting base. Since our base item we craft on is only ilvl 2, we block almost all mods from being rolled, which makes it easy to roll +1 to all elemental gems (fire, cold or lightning, your choice) at the cost of not being able to roll high tier mods normaly. Scour it and do perfect fossils until 30% quality (for a Harvest weapon enchant later) Step 5) Spam Deafening Essences of Woe on your ilvl 2 base which garantees a mod similar to T2 spell damage on a high level base until you hit +1 to all elemental spell gems with it (this will take around 35 essences on average) Step 6) Look if your weapon has an open prefix 6.1) if you don't have an open prefix, try to annul => if you fail, start again with essences
스포일러
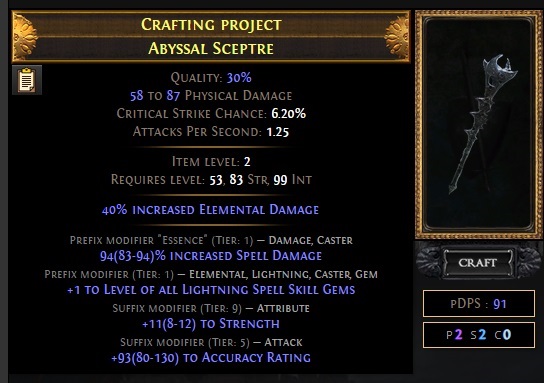 Step 7) Craft "prefixes cannot be changed" and scouring orb to clean your weapon form all other mods other than your 2 desired prefixes
스포일러
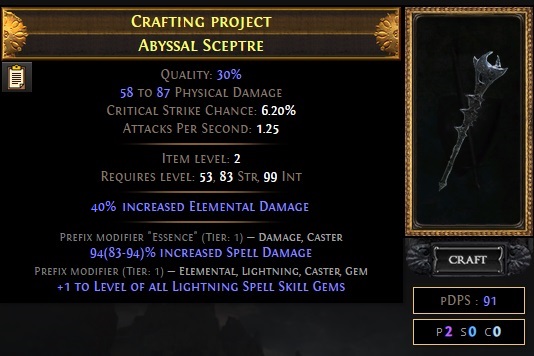 Step 8) Craft "can have up to 3 crafted modifiers" and then craft "Gain #% of Lightning Damage as Extra Chaos Damage" (of your desired element) and "#% chance to deal Double Damage while Focussed"
스포일러
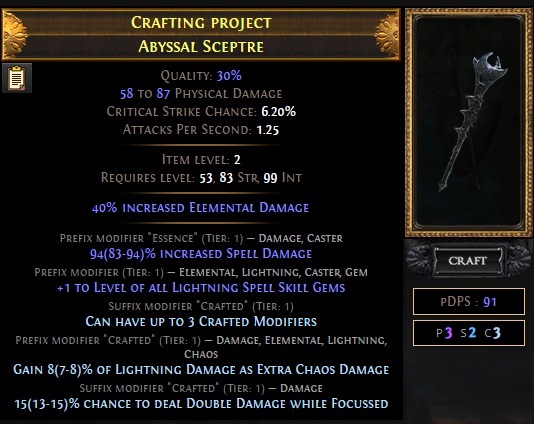 Step 9) Do a Beastcraft to add "Aspect of the Crab" in the Menangerie, get a good Harvest Weapon Enchant and you are done Your end result will look something like this (completely done without Harvest btw): 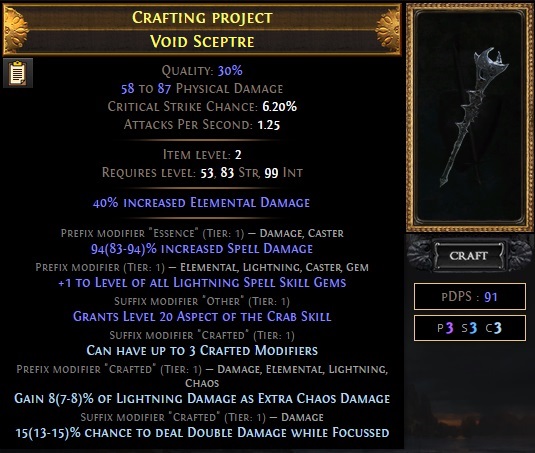 Delve Weapon (shaper explode mod mace) If you like Delving like I do (or are not a fan of "on death effects"), you probably thought about getting explode mod on your build somewhere. Well, there is a deterministic way to achieve that if you want to sacrifice a small portion of damage on your clearing skill, single target damage will be roughly the same on Explosive Trap so it is fine to go for something like this (works great for delving around depth 300 for fossil farming):
스포일러
1) Buy any ilvl 83+ Shaper Wyrm Mace 2) Quality it up to 30% with perfect Fossils (for possible Harvest Enchant later) 3) Spam Deafening Essences of Woe until you hit T1 "Gain x% of Physical Damage as Extra Fire Damage" (works great for any phyiscal conversion skill) with an open prefix and suffix (annul if you have to, if you fail try again) - you will hit it in about 40 Essences on average. 4) craft "cannot roll attack modifiers"
스포일러
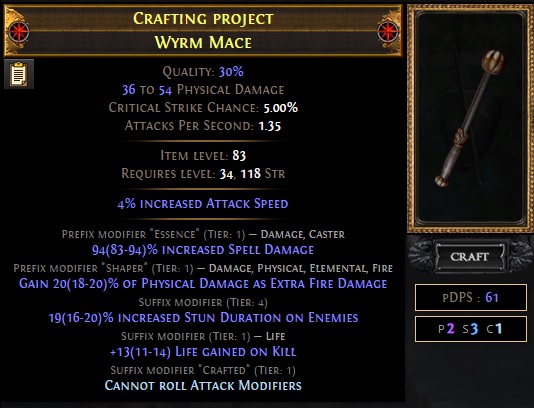 5) Exalt slam it (can be done with a lvl 3 Leo in Research Savehouse if you don't want to spent a pure exalt and is usually cheaper to do) - you can only slam a non-attack prefix this way, you have 75% chance to hit global elemental penetration that way or 25% to hit +1 to socketed gems (if you are unlucky hit +1 gems start over again with essences)
스포일러
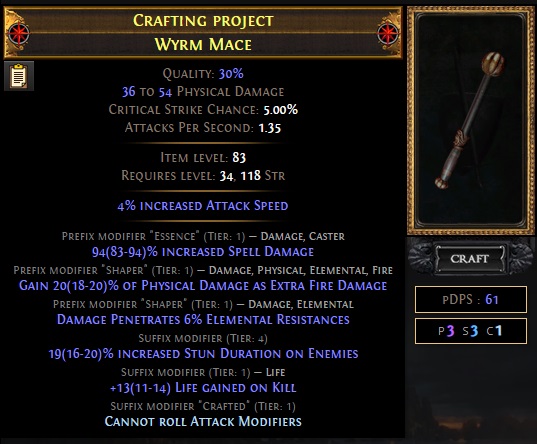 6) Remove "cannot roll attack modiefiers" and craft "prefixes cannot be changed" and do some Harvests: Slam your item with "reforge item with a new fire modifier" - you want to hit the shaper explode mod which is 1:4.5 chance to hit (if you fail, just do the same thing again, if you have no open suffix go for Harvest "reroll suffixes, keep prefixes" to get one)
스포일러
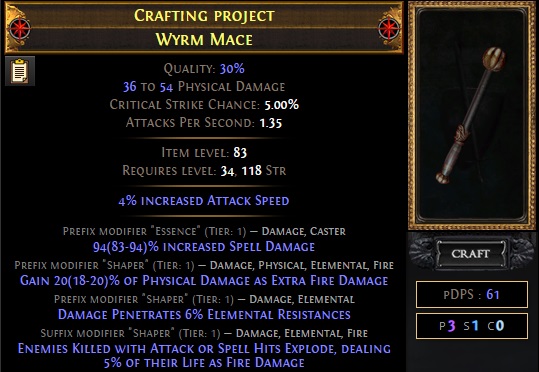 7) craft double damage while focused on your bench 8) Do a beast craft for "Aspect of the Crab" in your Menangerie Your delving weapon will look something like this - have fun: 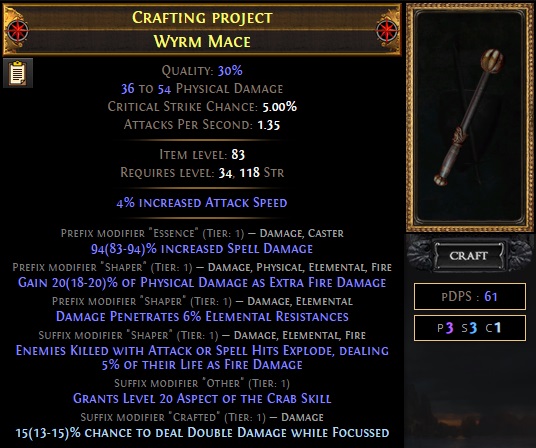 ______________________________________________________________________________ Ring Craft: In this section I want to demonstrate how to craft a endgame rings for this build. You can for sure also just buy decent ones from trade with just the attribute suffixes and resist and slap life on it with the bench to start out for 50C for each ring, but if you want to upgrade and craft one yourself read on (WARNING: rings are harder to make than the helmet or the weapon craft I showed, go for crafted life and stop after suffixes if you can't/don't want to afford it! Treat these as long term goals): Normal Attribute/Resist Ring
스포일러
1) Buy an lvl 84 Amethyst Ring with T1 or T2 strength with any T1 or T2 elemental resist from trade for a few chaos which has a suffix open. 2) Annul a prefix to get an open prefix (if you fail just buy another ring and go again, since it is cheap) so that you end up with a 4 mod ring with one open suffix and one open prefix
스포일러
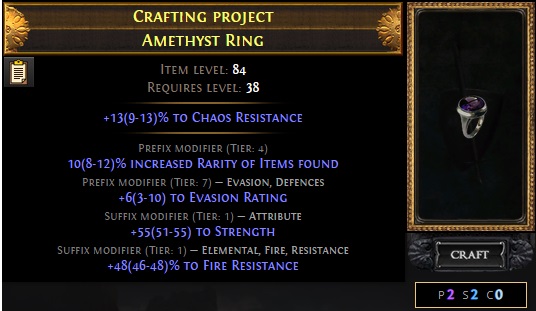 3) craft suffixes cannot be changed 4) Do some Harvest in a zone with at least lvl 74 (you can craft 10 levels above the seed level) until you find "Reforge a rare item including a new random chaos modifier" and slam your ring 5) With a chance of 1:3 you hit either T1 or T2 chaos resist; if you are satisfied with your suffixes craft suffixes cannot be changed again (if you hit 3 prefixs go harvest "reroll prefix keep suffix" to make room for the craft again)
스포일러
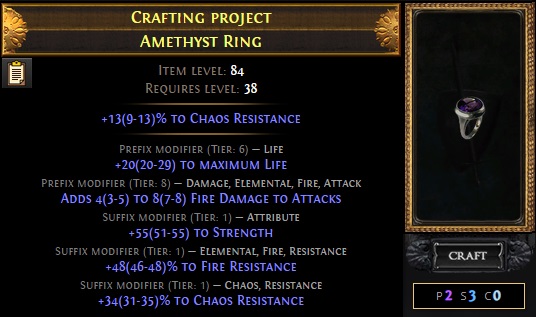 6) Do some Harvest again and go for "reforge including a random life modifier" and try to hit T1 or T2 life (chance to hit is 1:4.5)
스포일러
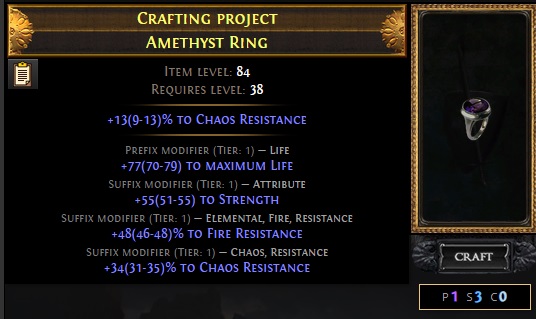 7) Do Immortal Syndicate Safehouses and put Aisling lvl 3 in Research again, kill Catarina and craft a veild mod on your ring and look out for mods in this priority order (chance to hit what you want is >80%): - any added flat dual elemental damage - %increased damage - Non-Channelling Skills have -10 mana Cost (to make your non trap skills free and safe some gem sockets)
스포일러
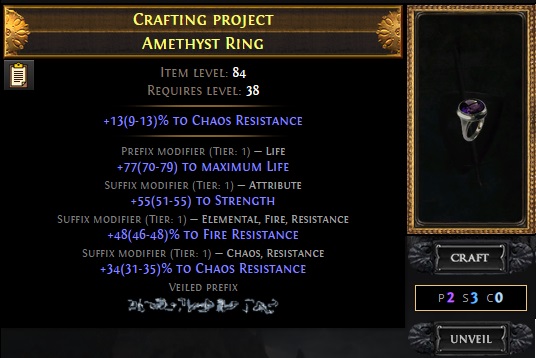 8) craft "faster start of energy shield recharge" (thanks to Eternal Youth keystone, this applies to life recharge) or another flat dual elemental damage mod and finish it of with prismatic catalysts. This is how your perfect deterministically crafted ring can look like: 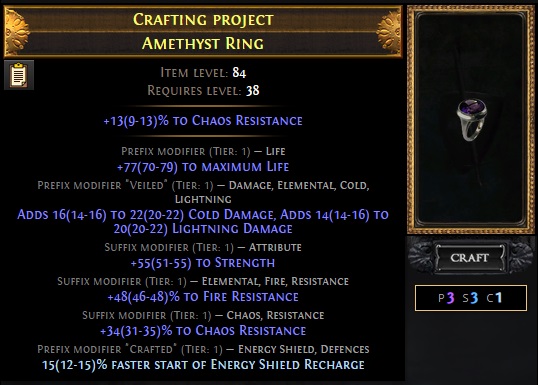 Curse on Hit Vermillion Ring
스포일러
1) Buy a Shaper influenced Vermillion Ring ilvl 84 and use 4 imbued catalyst on the white base to make caster modifiers more likely to occur 2) Transmute/Alteration until you hit Assassins Mark on hit (takes about 300 alterations on average), isolate it and change catalyst quality with 10 fertile catalysts (safes catalysts in the end, does not affect the crafting process in this case) 3) craft suffixes cannot be changed 4) imprint it with a beastcraft
스포일러
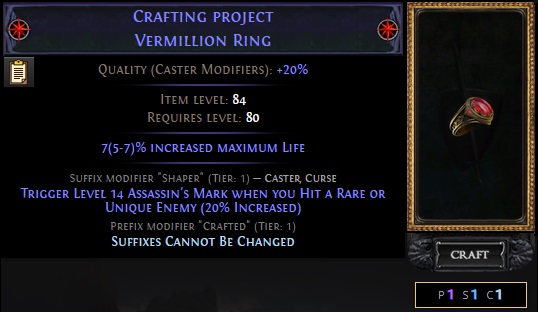 5) Do some Harvest and go for "reforge a normal or magic item including a random fire modifier" and go for T1 or T2 fire resistance with an open suffix (if you fail use imprint or try to annul and use imprint after if you fail)
스포일러
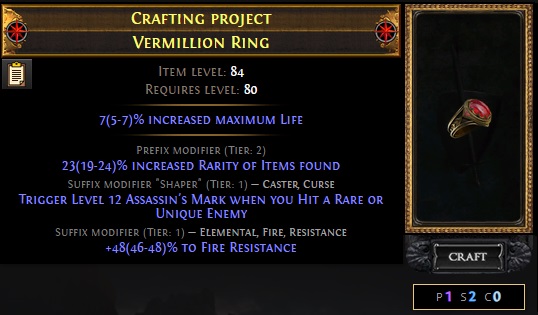 6) craft suffixes cannot be changed again 7) Do some Harvest again and go for "reforge a rare item including a random chaos modifier" and go for T1 or T2 chaos resistance; chance to hit is 1:3 (if you fail use imprint from before and go to step 5 again, if you hit 3 prefixs go harvest "reroll prefix keep suffix" to make room for the craft again)
스포일러
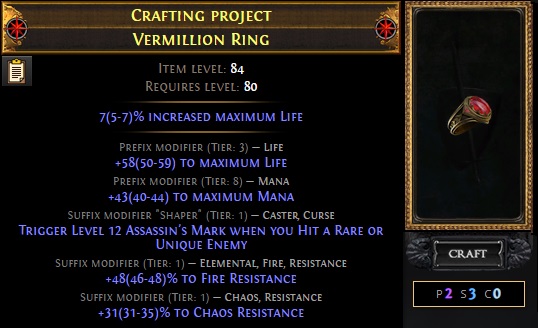 8) when you are satisfied with your suffixes craft suffixes cannot be changed again => "reforge including a random life modifier"; chance to hit T1 or T2 life is about 1:5 (if you don't hit do step 8) again)
스포일러
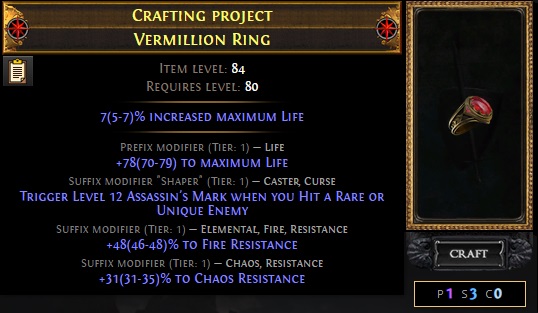 9) Do Immortal Syndicate Safehouses and put Aisling lvl 3 in Research again, kill Catarina and craft a veild mod on your ring and look out for mods in this priority order (chance to hit what you want is >80%): - any added flat dual elemental damage - %increased damage - Non-Channelling Skills have -10 mana Cost (to make your non trap skills free and safe some gem sockets)
스포일러
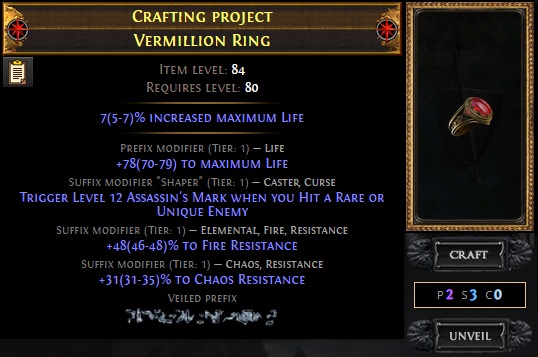 10) craft "faster start of energy shield recharge" (thanks to Eternal Youth keystone, this applies to life recharge) or another flat dual elemental damage mod. This is how your perfect deterministically crafted ring can look like: 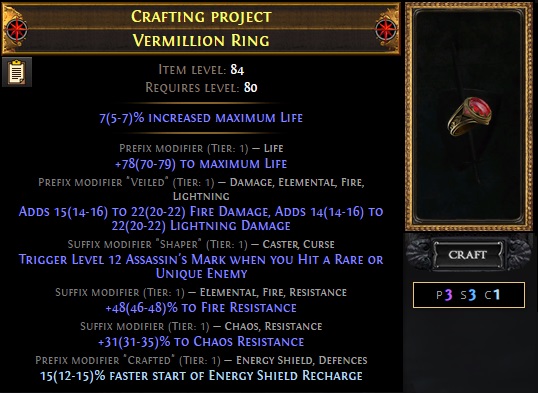 ______________________________________________________________________________ Wiesl_1404#1448 님이 2021. 5. 20. 오전 4:20:13에 마지막으로 편집
|
|
|
Video isnt't working after second 14
|
|
" Just checked it, works fine for me - (maybe a youtube thing) @all Guide is now finished btw, I think I am done - let me know if I should add anything you want to know. Wiesl_1404#1448 님이 2021. 5. 14. 오전 8:15:40에 마지막으로 편집
|
|
|
I'm excited to see someone utilize Mahuxotl's and I'm going to reroll my pathfinder to try this out for sure!
I think I'd love a section for why you chose raider and if you think other ascendancies would be viable too. For Slavedriver's Hand, I bought an Architect's Hand for 5c, Vial of dominance for 10c, and an T3 sacrifice temple for 20c to get around the cost strangeaeons#0943 님이 2021. 5. 14. 오후 1:25:20에 마지막으로 편집
|
|
" Nice! Glad to see this write-up inspired you to try a new build. " I think you are right about that, i definitely should have done that. I chose Raider because of a few things: - I wanted to include ailment immunity in the build, since it is unique-item heavy and have no room for avoid ailment crafts - I wanted to build around dodge and evasion because of Eternal Youth recharge which requires you to not get hit often (also because I wanted to use Aspect of the Crab which goes well with this strategy) - I wanted to focus on trap throwing speed for single target damage stacking and for Everlasting Sacrifice upkeep (Raiders perma Onslaught + Onslaught effect gives a ton of cast speed, which is then converted to throwing speed) - I wanted to move fast since trappers are usually limited by run/walk speed when it comes to clearing - free exposure from Ascendancy safes a gem slot and I am able to use multiple elements which goes well with the scorching ailment Saboteur would work as well but the regen would be wasted but you still want to take that node for shock and ignite immunity (can get chill/freeze immunity on boots and don't use Atziri's Step). Blind is great too but stacking evasion is harder on Saboteur, damage is not an issue. Pathfinder would probably work as well, if you focus more on flasks and cluster jewels, but it would not be as fast as Raider and has higher maintenance over all, which I am not a fan of on a trapper I would not pick Scion for this version of a trapper, since it doesn't offer that much to this particular build. Otherwise, Inquisitor is usually really good for doing trap builds too, but for this build it is terrible (hard to scale evasion, miles away from trap nodes so you need clusters, life and ES regen is completely wasted since you can't regen at all when you use the shield, you already have great elemental penetration on the build so you don't need to ignore resist, battle mage is not that good because if the trap skills I chose to use because of damage effectiveness scaling and we don't struggle with crit at all " You are right, you could do that. I just thought I exclude them in the recommendation since those gloves usually go for 1ex+ in the first two weeks of a new league which is quite steep for most people to start out with. Later in a league it is no problem to pick them up or create them yourself |
|
|
solid build nice job
|
|
|
Having never played traps in any league before, this seemed like as a good a time as any, especially since my raider has been shelved for the past couple of weeks. Quick question though - is there a reason you chose arc + explosive traps, or is any trap(s) viable? Again, I've partied with a friend who played a trapper like 8 leagues ago, so I honestly don't know much about it. I do like the tankiness a lot though, so I'd love to see what it can do.
Thanks! |
|
" I stated in my guide why I chose Arc and Explosive Trap (because of chaining, ramping and multi hitting) Arc is just insane clear if you invest into it, since it can chain off-screen. I played with Vaal Fireball Trap and Ball Lightning Trap a bit and it was fun as well (Vaal Fireball clears the whole screen). You can do Ice Trap, Fire Trap or Lightning Trap as well if you prefer that, everything works. Just adjust for them accordingly (AoE scaling, Pierce etc.) I saw people doing physical hit based traps with Reap and Exsanguinate this league; maybe if you ajust gear for that that could work. I personally wanted to try out Blazing Salvo and take a closer look into that. You can do cooldown traps for single target if you enjoy that (I don't) - damage is great. So yes - just play any skill you want and you have fun with. |
|
|
If I'm going to use Ball lightning? What's the best 6-link? Also can BL carry the single and clear if I'm lazy to use another trap setup?
I'm fine if it's a bit slower on clear vs arc |
|


